Following the Terminator Part 4
By Joseph Cohen
First published Crux Oct- Nov 2007
Day 7
The Moon is half lit and many of the structures that were only partly illuminated the previous day now show their details. The terminator is moving faster and even six to twelve hours results in marked changes in the appearance of structures. In the southern hemisphere many crater chains are visible. Flooding by lava flow is widespread and grooves radial to M. Imbrium are common. The large number of craters that are crowded together as they approach the south pole may be difficult to identify, but by working from known structures the problem can be resolved. Except at the polar region, the major structures in the northern hemisphere are well spaced and easily identified.
Southern Hemisphere
First find the distinctive ALMANON (Fig. 1, 1) west of M. Nectaris (see day 6 S.H.) Follow the curve to the south to meet AZOPHI G (Fig. 1, 2) south of the ABENEZRA (Fig. 1, 3) group.
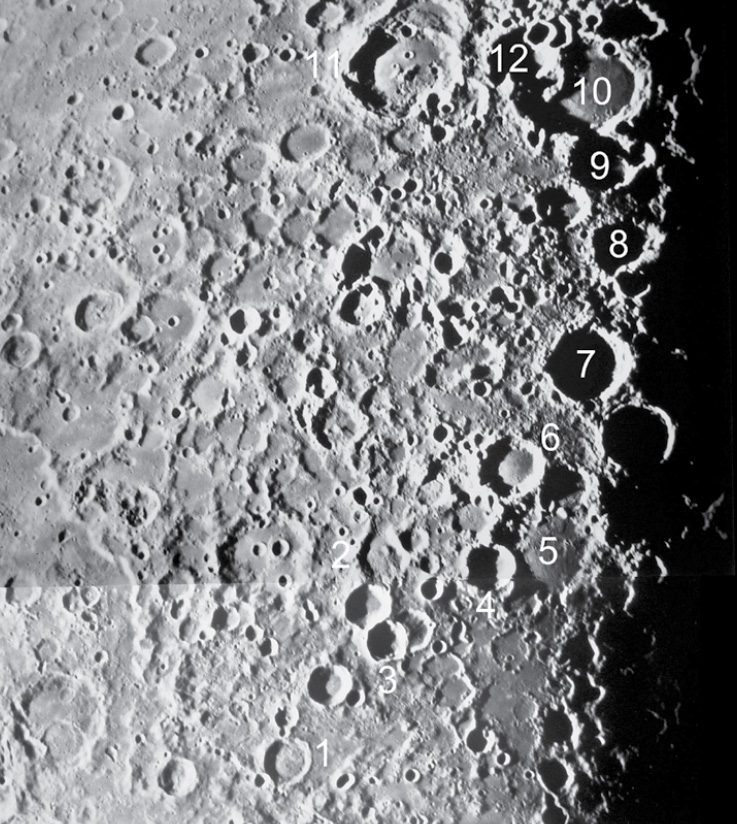
Figure 1 :
South-central region of the Moon on Day 7.
1 Almanon 2 Azophi G 3 Abenezra 4 Playfair 5 Playfair G 6 Apianus 7 Aliacensis 8 Nonius 9 Fernelius 10 Stofler 11 Maurolycus 12 Faraday
Images from the Consolidated Lunar Atlas maintained by the Lunar and Planetary Institute.
It touches its namesake and its south wall is absent forming a vase-like structure. Three small craterlets separate it from PLAYFAIR (Fig. 1, 4) that is not a member of the curve. It invades PLAYFAIR G (Fig. 1, 5), a large low-walled flooded crater. South of the pair, APIANUS (Fig. 1, 6) has several craterlets at its north wall. Note that from Almanon to Apianus all the craters have a polygonal shape, flooded floors and no central mountains. Further southwest along the curve, ALIACENSIS (Fig. 1, 7) has a square shape and a tiny mountain near its centre. A small crater separates it from WALTER, (see day 8) a much larger square crater that ends the chain. A ridge of mountains from Walter’s north wall has its south end damaged by craterlets and it shares its west wall with DESLANDRES a very large flooded crater not recognized in Goodacre’s map of the Moon, and which may only be partly lit tonight. Both craters are easily identified just south of the southeast corner of M. NUBIUM and will be used as a reference point the following day when the area is more visible. Walter shares its east wall with NONIUS (Fig. 1, 8), a smaller crater whose south wall has been destroyed. At the north end of their common wall a small crater has a small craterlet within its floor. Further south, FERNELIUS (Fig. 1, 9) has several craterlets on its walls and a small crater invades its west wall. Its damaged south wall opens to STOFLER (Fig. 1, 10), the largest member of the MAUROLYCUS (Fig. 1, 11) group that is centred around STOFLER G, a small crater with a central mountain. Stofler has a smooth floor with some striations and a number of small craters lie at its walls. The moderate sized FARADAY (Fig. 1, 12) invades its southeast wall with two small overlapping craters destroying part of its own south wall. From Faraday’s west wall a ridge on the floor of Stofler curves to the north ending at a small mountain, both being parts of a small crater.
South of Stofler is a triad of medium sized craters. LICETUS (Fig. 2, 1), the closest, has a group of craterlets at its destroyed south wall, allowing it to communicate with HERACLITUS (Fig. 2, 2) that has straight east and west walls, giving the appearance of a round bottomed gutter with a central ridge running south west.
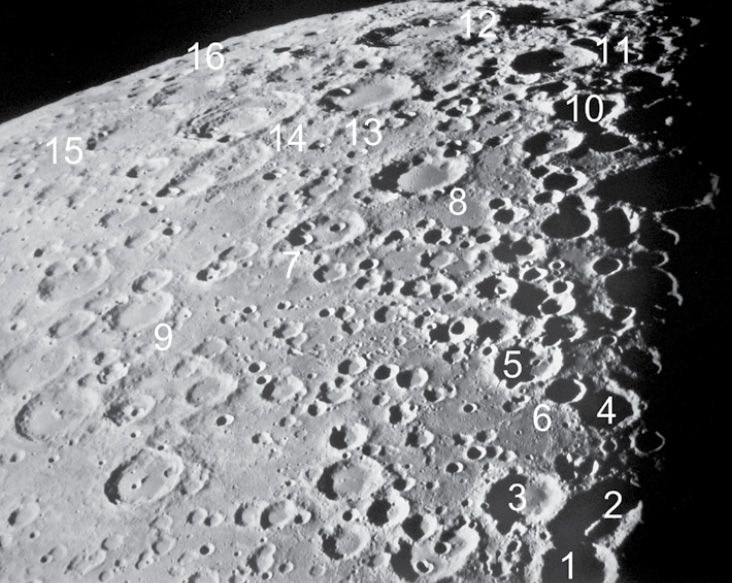
Figure 2 :
Southern limb of the Moon on Day 7.
1 Licetus 2 Heraclitus 3 Cuvier 4 Lilius 5 Jacobi 6 Lilius A 7 Mutus 8 Manzinus 9 Nearch 10 Simpelius 11 Schomberger 12 Scott 13 Boguslawsky 14 Boussingault 15 Helmholtz 16 Neumayer
Image from the Consolidated Lunar Atlas maintained by the Lunar and Planetary Institute.
A “draining crater” HERACLITUS D lies at its south end and its west wall is continuous with its namesake’s west wall. Sharing its east wall, CUVIER (Fig. 2, 3) has a flooded floor and is about the same size as Licetus. To its southwest LILIUS (Fig. 2, 4), a smaller crater, is the only one in the local area with a central mountain and is separated from JACOBI (Fig. 2, 5), a larger oval crater with craterlets in its floor and some on its walls, by a small crater LILIUS A (Fig. 2, 6.) The three craters point east to MUTUS (Fig. 2, 7) lying at twice the distance of the combined length of the former group that is recognized by its oval shape and the two small deep craters in its floor. North of this line flooding is apparent, with many small craters and craterlets lying in the area. At the same meridian as Mutus, MANZINUS (Fig. 2, 8) with its peppered walls and smooth floor lies closeby to the south. The two craters point north to NEARCH (Fig. 2, 9) lying south of ROSENBERGER and south to SIMPELIUS (Fig. 2, 10.) Nearch with the smaller NEARCH A form a distorted figure of eight. Simpelius has three small craters at its north boundary and another acting as a channel between the middle of the three and the main crater. Simpelius lies halfway between Moretus and Manzinus. South and slightly east, appearing elongated due to its proximity to the pole SCHOMBERGER (Fig. 2, 11) is separated from Simpelius by several small craters. Closer to the limb, SCOTT (Fig. 2, 12) and at its east side DEMONAX are best seen with the LEIBNITZ MOUNTAINS at the limb when libration in latitude is favourable [negative to the north]. BOGUSLAWSKY (Fig. 2, 13) lying east of Schomberger has a small crater within its southeast wall. These three form a broad based triangle with Demonax at its apex, whilst to its east BOUSSINGAULT (Fig. 2, 14) has a small crater on its northeast wall. Together with Boguslawsky, it, Mutus and Manzinus to the north form an approximate square. Touching the southeast corner of the square, HELMHOLTZ (Fig. 2, 15) and its south companion NEUMAYER (Fig. 2, 16) may be found.
To view further north, return to Walter lying east of the large Deslandres. To its northeast, Aliacensis has a square shape and begins a chain of northbound moderate sized craters. The next, WERNER almost touches its north wall and has an obvious polygonal shape with several small mountains in its floor. It touches BLANCHINUS, a larger crater whose walls have been extensively damaged. In its east floor that is in the wall’s shadow, a remnant of a round ridge suggests that a later impact occurred in the older crater’s floor. To its east the smaller poorly defined KRUSENSTERN lies between it and the eastern Apianus. Slightly to the northwest, Blanchinus shares its northwest wall with the smooth-floored LACAILE whose walls are extensively damaged. The irregular northeast DELAUNEY has a central spine running south west and parallel to its east straight wall, both being at right angles to its straight north wall. Passing north through a jumble of small craters and craterlets the same distance as the chain just viewed, the irregular oval outline of PARROT (Fig. 3, 1) with a number of ridges arising from its north wall is often poorly defined, but shares its northwest wall with the polygonal ALBATEGNIUS (Fig. 3, 2), a large flooded crater with the small KLEIN (Fig. 3, 3) within its west wall, both having central mountains.
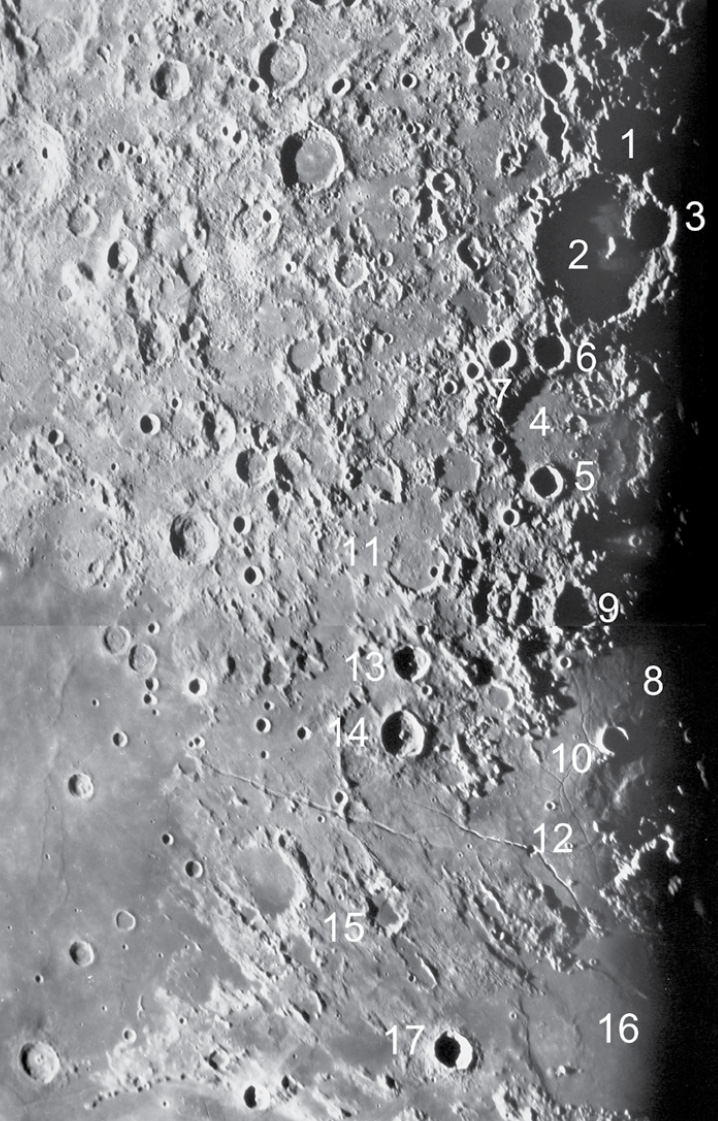
Figure 3 :
Central region of the Moon on Day 7.
1 Parrot 2 Albategnius 3 Klein 4 Hipparchus 5 Horrocks 6 Halley 7 Hind 8 Sinus Medii 9 Rheaticus 10 Triesnecker 11 Lade 12 Hyginus 13 Godin 14 Agrippa 15 Boscovitch 16 Mare Vaporum 17 Manilius
Images from the Consolidated Lunar Atlas maintained by the Lunar and Planetary Institute.
Slightly north the large flooded HIPPARCHUS (Fig. 3, 4) has a fragmented low wall that at later lightings makes it difficult to find but for the presence of HORROCKS (Fig. 3, 5) a small deep crater at its northeast floor. A horseshoe remnant of a small crater lies at the centre of the large crater. West of this chain another chain may be partly illuminated (see Day 8). Between the last two large craters, a short chain of small craters decrease in size as they curve to the east and then north. The first and largest is HALLEY (Fig. 3, 6) whose south wall is crossed by a groove formed by a series of very small craterlets that passes south to skirt the east wall of Albategnius. A craterlet also lies at its north wall and HIND (Fig. 3, 7) the second largest is just east of Halley. Two smaller craterlets are followed by several tiny ones that are a good test for your telescope. At the east end of the south shore of SINUS MEDII (Fig. 3, 8), the low damaged walls of RHEATICUS (Fig. 3, 9) lie on a line between Horrocks and TRIESNECKER (Fig. 3, 10) lying in the Sinus. South west of Rheaticus, REAUMUR at the south coast of the Sinus forms a triangle with Rheaticus and Horrocks. East of its base, the low walled flooded LADE (Fig. 3, 11) is poorly seen, but is identified by a small deep crater at its west floor.
Northern Hemisphere
Extending the reference line from Horrocks through Rhaeticus, Triesnecker a small crater in the floor of Sinus Medii is crossed. At the east side of the crater, fine rilles can be seen running north and south. West of the crater HYGINUS (Fig. 3, 12) situated at the angle of its cleft, OUKERT a smaller but obvious crater with a small central mountain has a deep interrupted groove at its west side and a small mountain ridge touching its north and south walls. East of the Sinus, two polygonal craters GODIN (Fig. 3, 13) and its northern companion AGRIPPA (Fig. 3, 14) with central mountains form the base of a triangle with d`ARREST to the east. The base is part of a second reference line with Lade in the south and BOSCOVICH (Fig. 3, 15) in the north, which is recognized by its dark floor, fragmented walls, and lying at the southeast edge of the dark MARE VAPORUM (Fig. 3, 16.) West of Godin is a curious structure that is a small mountain crossed by an elevated ridge that extends to the south and catches the morning rays. Agrippa and Triesnecker form an equilateral triangle with the tiny Hyginus crater to the north. Having crossed Boscovich whose dark floor is like many other craters in the area similar to the floor of M. Vaporum, the second line passes midway between MANILIUS (Fig. 3, 17) to its west and the smaller MENELAUS to the east. Both have central mountains and haloes that also cover their floors. The line continues to end at a small steep sided bay at the west side of M. SERENITATIS (Fig. 4, 1) just south of the small offshore SULPICIUS GALLUS (Fig. 4, 2.)

Figure 4 :
Northern region of the Moon on Day 7.
1 Mare Serentiatis 2 Sulpicius Gallus 3 Apennine Range 4 Mare Imbrium 5 Conon 6 Cape Fresnel 7 Mt Hadley 8 Autolycus 9 Aristillus
10 Caucasian Mountains 11 Calippus 12 Cassini 13 Mt Piton 14 Theaetetus 15 Alps 16 Valley of the Alps 17 Mare Frigoris
18 Galle 19 Egede 20 Aristoteles 21 Mitchel 22 Eudoxus 23 Kane 24 Meton 25 C Mayer 26 Sheepshanks
Images from the Consolidated Lunar Atlas maintained by the Lunar and Planetary Institute.
The first reference line, (Horrocks-Rhaeticus- Triesnecker) leaves Sinus Medii to pass west of the Hyginus cleft to enter M.Vaporum and continues across the sea to meet the dramatic APENNINE RANGE (Fig. 4, 3) one of the most interesting lunar features. It has a precipitous northwest border whose high mountains throw a shadow onto M. IMBRIUM’S (Fig. 4, 4) floor. Only the northeast portion of the range will be visible tonight. The line then crosses CONON (Fig. 4, 5) the only small but obvious crater in this area lying next to MT BRADLEY at the coast. The range slopes to the northeast to end at CAPE FRESNEL (Fig. 4, 6) a jumble of small mountains. MT HADLEY (Fig. 4, 7) lies at the west side of the broad end of the range and it and its companion and the two mountains between them have their east faces brightly lit by the morning sun. Favourable lighting, adequate aperture and magnification will later show winding fine rilles in the sea below the coast. The line leaves the range to enter M. Imbrium, where west of the strait between it and M. Serenitatis, AUTOLYCUS (Fig. 4, 8) and its north companion ARISTILLUS (Fig. 4, 9) both appear as rings with their floors in darkness. To their east the CAUCASIAN MOUNTAINS (Fig. 4, 10) can be divided into three blocks, the south smaller block forming the north promontory of the strait consists of one large and a number of small hills surrounding it. It is separated from the larger second block whose north end facing north east is brightly illuminated and separated by a valley from the third largest block. At the base of this block, CALIPPUS (Fig. 4, 11) lies inland next to CALIPPUS A at the coast, whose high east wall throws a shadow onto its floor and communicates to the sea. Both craters point to the low walled CASSINI (Fig. 4, 12) lying off shore in M. Imbrium. This crater’s ramparts should be visible, but the two small craters on its floor may not be seen until later.
A line crossing the last three craters passes close to MT PITON (Fig. 4, 13) a solitary mountain in the sea that will later throw a long shadow to the west giving a false impression of its height. The west coast of the range throws a short shadow onto the sea, where close to the coast between the first two blocks, the small THEAETETUS (Fig. 4, 14) can be found. Just north of Calippus, the coast changes direction to face south and the landmass to its north is known as the ALPS (Fig. 4, 15). At AGASSIZ, a prominence, the coast again changes direction to face southwest, and at this steep coast three mountains stand out. The first is Agassiz followed to the north by MT DEVILLE and lastly MT BLANC the tallest of the three is lying slightly inland.
The coastline again changes to face south and at the angle formed, the famous VALLEY OF THE ALPS (Fig. 4, 16) crosses the Alps but does not open to M. FRIGORIS (Fig. 4, 17) at the east and is blocked by mountains from reaching M. Imbrium. The direction of the valley points east and a line in the same direction leads to the small GALLE (Fig. 4, 18) in the far distance. The line then crosses the larger low walled GARTNER lying north of the shore with its south wall missing and a craterlet is in its floor. North of the west end of Gartner the small but deeper DEMOCRITUS begins a polar chain that will be used later to explore that region, whilst to its east THALES lying at the southwest corner of DE LA RUE will soon show its ray system. A wide southern bay east of the Alps has EGEDE (Fig. 4, 19) at its south end and the terraced ARISTOTELES (Fig. 4, 20) at its east end protruding into the sea. The latter has several small mountains on its floor and the small MITCHELL (Fig. 4, 21) outside its east wall. Its smaller south companion EUDOXUS (Fig. 4, 22) also has small mountains on its floor and both lie in the east part of the LONG ISLAND that is between M. Frigoris and the south M. Serenitatis and M. Imbrium. To explore the east portion of the polar region, follow a north line from the east sides of Eudoxus and Aristoteles. It will cross Galle in M. Frigoris, pass west of two craterlets to cross KANE (Fig. 4, 23) a shallow flooded crater with fragmented walls. Just to its north the line crosses MOIGNO a small crater associated with a small cluster of craterlets. ARNOLD at its northeast side has a craterlet in its west floor whilst the smaller thinner NEISON at Moigno’s northwest side has several small craterlets on its fragmented walls and a flooded floor. Remembering the effect of libration on reference lines appearance and position, BAILLAUD at the limb at the end of the line may not be visible. West of Neison, the south leaf of the large irregular clover leaf- like METON (Fig. 4, 24) maybe partially seen, whilst south of both is the small regular oval C.MAYER (Fig. 4, 25.) Further south a similar but smaller crater SHEEPSHANKS (Fig. 4, 26) will be found. C. Mayer is the third member of the Democritus-Kane chain and is separated by two shallow craters from WC BOND. South of C. Mayer, a small mountain separates it from a close pair of craters, Sheepshanks being the southeast crater.