Following the Terminator Part 5
By Joseph Cohen
First published Crux Dec 2007- Jan 2008
Day 8
The moon has a gibbous shape and overhead lighting shows details of structures hidden on previous viewing. The eastern seas, lakes and much of M Frigoris have been exposed. The difference between the crowded Southern Hemisphere and the more open Northern Hemisphere is obvious and at the early part of this period a number of craters stand out at the terminator that can be a guide to other structures. In turn from the South Pole area, Moretus with a central mountain is followed by Clavius a member of the Southern Cross, whilst further north Bullialdus lies near the west coast of M Nubium. Next, Copernicus is west of the Apennines, and lastly the dark floored Plato in the Long Island lies south of M Frigoris.
Southern Hemisphere
South of the south east corner of M. NUBIUM (Fig 1, 1), WALTER (Fig 1, 2) and the large flooded DESLANDRES (Fig 1, 3) show their spoilt square shapes, whilst to their west at the sea coast PITATUS (Fig 1, 4), a dark floored polygonal crater with low damaged walls, has a small mountain slightly to the northwest of its centre.
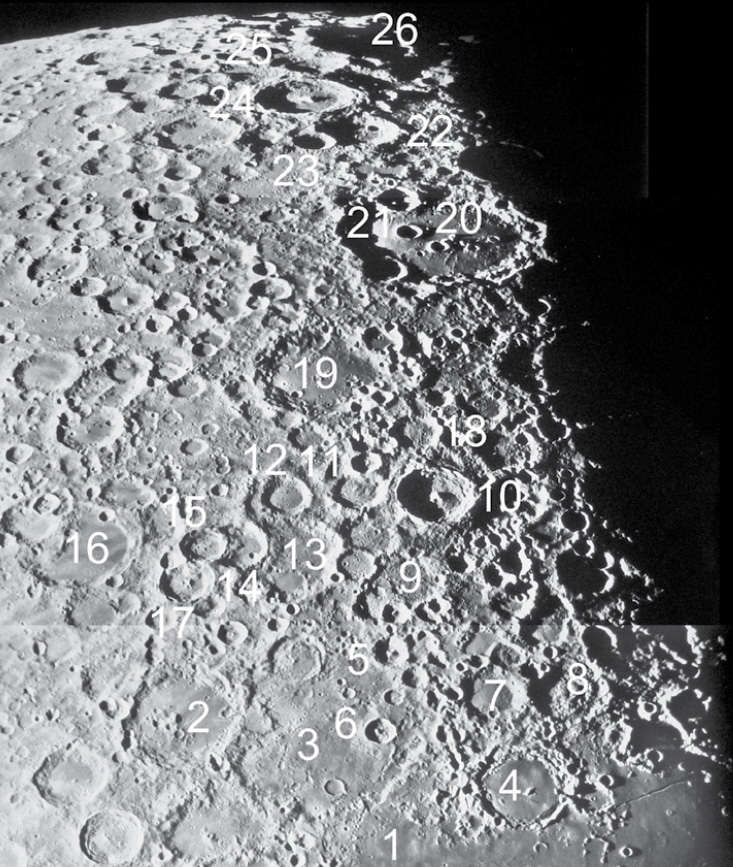
Figure 1:
Southern limb of the Moon on Day 8
1 M. Nubium 2 Walter 3 Deslandres 4 Pitatus 5 Ball 6 Hell 7 Gauricus 8 Wurzelbauer 9 Sasserides 10 Tycho 11 Pictet 12 Saussure 13 Orontius 14 Huggins 15 Nasireddin 16 Stofler 17 Miller 18 Street 19 Maginus 20 Clavius 21 Rutherford 22 Gruemberger 23 Cysatus 24 Moretus 25 Short 26 Newton
Images from the Consolidated Lunar Atlas maintained by the Lunar and Planetary Institute.
From its east wall a chain of small craterlets become larger until they reach BALL (Fig 1, 5), the largest that has a central mountain, lying at the southwest wall of Deslandres. HELL (Fig 1, 6) in Deslandres’ north floor also has a central mountain. West of the chain, the flooded GAURICUS (Fig 1, 7) and its slightly larger west companion WURZELBAUER (Fig 1, 8), with a number of mountain ridges in its darker floor, form a triangle with Pitatus pointing to the north. At Ball the chain bends south to enter SASSERIDES (Fig 1, 9), a larger flooded crater, through an arc of small craters at its north wall. A crater invading its east wall begins a line of larger craters that pass east of TYCHO (Fig 1, 10), a well formed terraced crater whose east outer wall and west inner wall are illuminated. There is a prominent multiple mountain at its centre whose tip stands out from Tycho’s shadowed floor. Later a system of rays will be seen to develop from a dark ring around the crater that will be used to identify other features. East of Tycho PICTET (Fig 1, 11), the third member of the line, is a well-formed crater with small mountains on its west floor and its south wall is invaded by a smaller companion. Near its east wall SAUSSURE (Fig 1, 12), a smaller crater, has a prominent ridge outside its east wall that may be the east wall of an original larger crater that now contains a more recent arrival. To its north is a triad of craters each being invaded by a smaller one, which is a general rule of lunar craters, although sometimes the rule is broken. ORONTIUS (Fig 1, 13) the largest, is invaded by HUGGINS (Fig 1, 14) that is itself invaded by the smallest, NASIREDDIN (Fig 1, 15.) The three craters are flooded and point east to STOFLER (Fig 1, 16), the northwest member of the MAUROLYCUS group. The outer ridge of Saussure is continued as the west wall of Huggins forming an S shaped curve. MILLER (Fig 1, 17), a small crater north of Nasireddin is recognised by its central mountain. From Pictet the line continues south as a series of craterlets skirting the east wall of STREET (Fig 1, 18), separating it from and destroying the northwest wall of the large flooded square MAGINUS (Fig 1, 19.) Unlike Tycho, the other three craters of the Southern Cross have damage to their walls. North of Maginus and touching its wall, PROCTOR a small crater with a flooded floor and tiny craterlets on its walls, begins a line of smaller craters that curves around the east side of Maginus to join a jumble of small craters lying between Maginus and the east LILIUS-JACOBI group. The central mountain in Lilius’ floor will identify the crater from all the others in the area. Further south of Tycho the huge CLAVIUS (Fig 1, 20), over two hundred kilometres in diameter, cannot be missed even if not fully illuminated. Like Maginus, it also has a square shape and the size of its flooded floor following the curvature of the moon’s surface, presents as a shallow convex dome. Early morning lighting shows the ramparts of a series of small craters starting with the larger RUTHERFORD (Fig 1, 21), that has a central mountain and lies at the southeast wall of the main crater. They decrease in size as they curve across the crater’s floor. The western two of the curve are hidden in the shadow of the west part of the floor due to its curve, but will appear later in the day. A large crater LONGOMONTANUS is the west member of the group forming a ‘Southern Cross’ whose axis will be used to identify other features. Its north south axis passes through the centres of Tycho and Clavius to enter a narrow area devoid of any features, but tonight it is in darkness. However, along its east edge several craters can be identified. The first, GRUEMBERGER (Fig 1, 22) has the small CYSATUS (Fig 1, 23) invading its northeast wall. Moving to the south is the deep larger MORETUS (Fig 1, 24) with its prominent central mountain that is often useful as a guide to the area. The last is the small SHORT (Fig 1, 25.) The floors of the three are in darkness and lie on a curve convex to the east. West of the south end of the curve, the larger NEWTON (Fig 1, 26), whose floor is in darkness touches the west wall of Short. Extending the ‘Southern Cross’ reference line to the north will touch the west side of Ball lying at the south west side of Deslandres that shares its east wall with the square Walter.
North of Walter is a chain of mostly large well-defined craters running parallel to the east Parrot-Hipparchus group. The first, REGIOMONTANUS (Fig 2, 1), is a five-walled structure sharing its southwest wall with Deslandres. Its walls are damaged and a small mountain ridge near its north wall has a tiny craterlet at its centre.
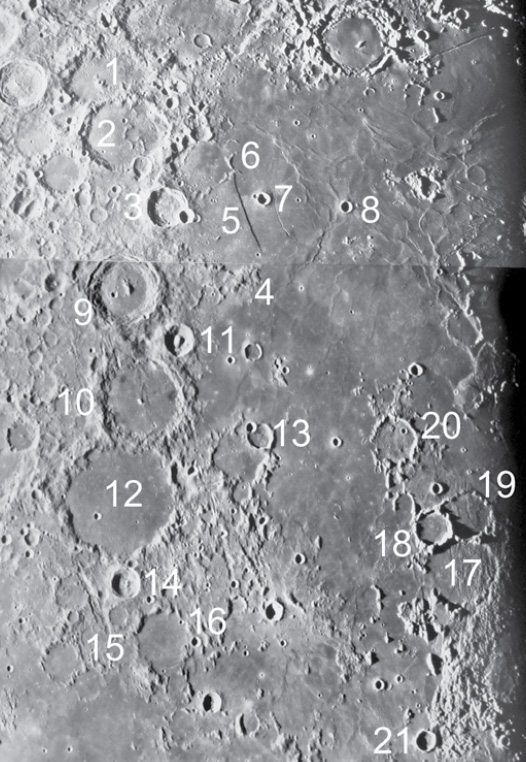
Figure 2:
South-central region of the Moon on Day 8
1 Regiomontanus 2 Purbach 3 Thebit 4 Cape Aenarium 5 Straight Wall 6 Stag’s Horn Mtns 7 Birt 8 Nicollet 9 Arzachel 10 Alphonsus 11 Alpetragius 12 Ptolemaus 13 Davy 14 Herschel 15 Sporer 16 Flammarion 17 Fra Mauro 18 Parry 19 Bonplan 20 Guerlike 21 Gambert
Images from the Consolidated Lunar Atlas maintained by the Lunar and Planetary Institute.
The crater’s south end points to Walter and its broken north wall is shared with PURBACH (Fig 2, 2), a larger polygonal flooded crater that also has a damaged almost absent north wall with two twisted wormlike broken mountain ridges lying side by side near its north wall. A small crater at its northwest end points to the small THEBIT (Fig 2, 3) jutting out to the sea. A small but obvious crater on Thebit’s northwest wall has a tiny craterlet touching the latter’s west wall to form a distinctive triad. The west wall of Purbach continues as the east wall of Thebit, swinging around to the west to become CAPE AENARIUM (Fig 2, 4.) If the floor of the sea nearby is lit at a tangent, traces of a ridge show that the previous three main features are all part of a very large crater whose west portion was flooded and destroyed when the sea was formed. In the middle of this large crater, a fault known as the STRAIGHT WALL (Fig 2, 5) runs in a north-south direction finishing at the southern STAG’S HORN MOUNTAINS (Fig 2, 6.) The direction of the wall is the same as the many grooves and small craterlet chains in the area. The wall throws a shadow onto the sea’s floor, but in the lunar evening its west surface is brightly lit. A small crater west of the wall, BIRT (Fig 2, 7), has a tiny craterlet at its east side and further west NICOLLET (Fig 2, 8), another small crater lies outside the remnants of the large crater. The two small craterlets point to the large BULLIALDUS in the west portion of the sea. (Bullialdus and the HIPPALUS Peninsula will be described in Day 9-10). East of the cape ARZACHEL (Fig 2, 9) is of moderate size with thick terraced walls, a short mountain ridge and a small craterlet near its centre.
Arzachel and the next two large craters of the chain have flooded floors and an obvious polygonal shape. A short ridge from Arzachel’s east wall separates it from ALPHONSUS (Fig 2, 10), a larger crater with a small central mountain on a spine running in the same direction as the Straight Wall. Three dark spots can be seen at 3, 8, and 10 o’clock although the 8 o’clock spot may be hidden in the shadow of the east wall. Alphonsus is of interest due to the series of photos taken by Ranger 9 before it crashed onto the crater’s floor, and because it is the only crater that has shown activity by visual, photographic and spectroscopic investigation. Its south and north walls are damaged but its tall east walls throw interesting shadows on its floor. ALPETRAGIUS (Fig 2, 11), a small deep crater with a central mountain, lies in the sea at its south west side. The last and largest member is the flooded PTOLEMAEUS (Fig 2, 12), sharing its damaged wall with Alphonsus. Ptolemaeus has a craterlet in its north east floor and west of the junction of the two, DAVY (Fig 2, 13) at the end of a ridge jutting out into the sea, looking like a claw holding a craterlet in its grasp. The two previous members show their polygonal shapes and flooded floors, and Ptolemaeus’ size allows its convex floor to be seen. Outside its north wall HERSCHEL (Fig 2, 14), a small crater, has a central mountain on a ridge. The crater has a groove near its east side and SPORER (Fig 2, 15), a small shallow crater, touches FLAMMARION (Fig 2, 16), a larger flooded crater with shallow damaged walls. REAUMUR, a similar but smaller crater further east like its companion, RHAETICUS, lies southeast at the coast of SINUS MEDII. The last three craters lie close to a westerly line. Protruding into M. Nubium from the area south of COPERNICUS, the FRA MAURO peninsula contains four craters with shallow flooded floors and low damaged walls. The largest, Fra Mauro (Fig 2, 17), soon loses its identity and shares its south wall with the more obvious east PARRY (Fig 2, 18) and the larger BONPLAN (Fig 2, 19). Both have a polygonal shape and share adjoining walls. At the south tip of the peninsula the larger GUERLIKE (Fig 2, 20) also has a polygonal shape with two horns projecting from its south wall and a broken north pointing ridge at its destroyed north wall. North and west of the ridge a curved group of mountains appear like the handle of a walking stick touching the east wall of Parry. Further north from the east side of the peninsula, the rest of the broken walking stick runs north to point to GAMBERT (Fig 2, 21), a small polygonal crater east of the base of the peninsula. South of the peninsula several ghost craters lie in the sea whose western part has been named M. COGNITUM since Ranger 7 landed there. West of this sea the RIPHAEN MOUNTAINS will be found with the short URALS at its north-west end and the small bright EUCLIDES west of the main range. The crater is surrounded by a bright halo whose spread is blocked from entering M. Cognitum by the range.
Northern Hemisphere
West of Triesnecker in Sinus Medii and north of Reaumur are two flooded craters with low damaged walls. MURCHISON (Fig 3, 1), the larger, is open to the south sharing its broken walls with the smaller west PALLAS (Fig 3, 2) that has a small slightly offset mountain in its floor. To their northeast the small UKERT (Fig 3, 3) has an interrupted groove near its west wall that is radial to M Imbrium and parallel to the west limb of the HYGINUS CLEFT further east. Crossing into the dark M. VAPORUM (Fig 3, 4), the bright MANILIUS with its halo stands out in the eastern part of the sea, whilst north of the sea the western part of the APENINNINE MOUNTAINS (Fig 3, 5) are seen. West of the Apeninnes the massive COPERNICUS (Fig 3, 6) is not fully illuminated, but shows its east rampart, central mountain group and the double crest of its walls and many domes can be seen south and west of the crater.
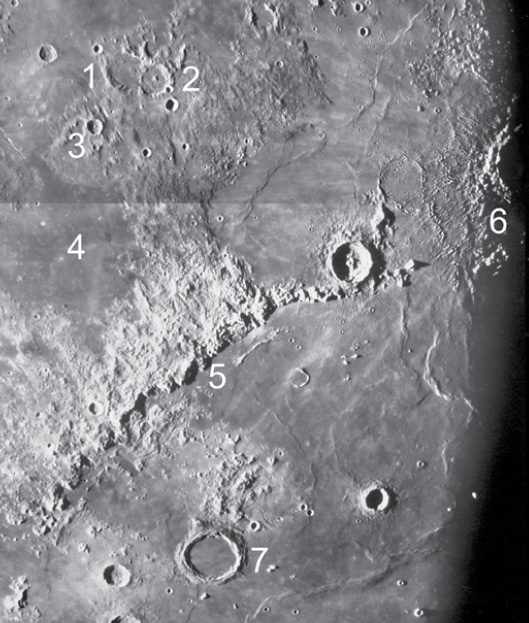
Figure 3:
North-central of the Moon on Day 8
1 Murchison 2 Pallas 3 Ukert 4 M. Vaporum 5 Apennine Mtns 6 Copernicus 7 Archimedes
Images from the Consolidated Lunar Atlas maintained by the Lunar and Planetary Institute.
North of the range, the eastern portion of M Imbrium is more fully lit and the details of the Archimedes group can be seen in the sea. The large ARCHIMEDES (Fig 3, 7 and Fig 4, 1) shows its terraced walls, flooded banded floor, and three fragmented ranges at its south wall with the SPITZBERGEN RANGE (Fig 4, 2) to its north looking like the wings of a flying bird. To its east AUTOLYCUS (Fig 4, 3) lies west of the strait whilst east of the strait the bright spot is LINNE (Fig 4, 4), a craterlet that caused some controversy in the mid 1800’s.
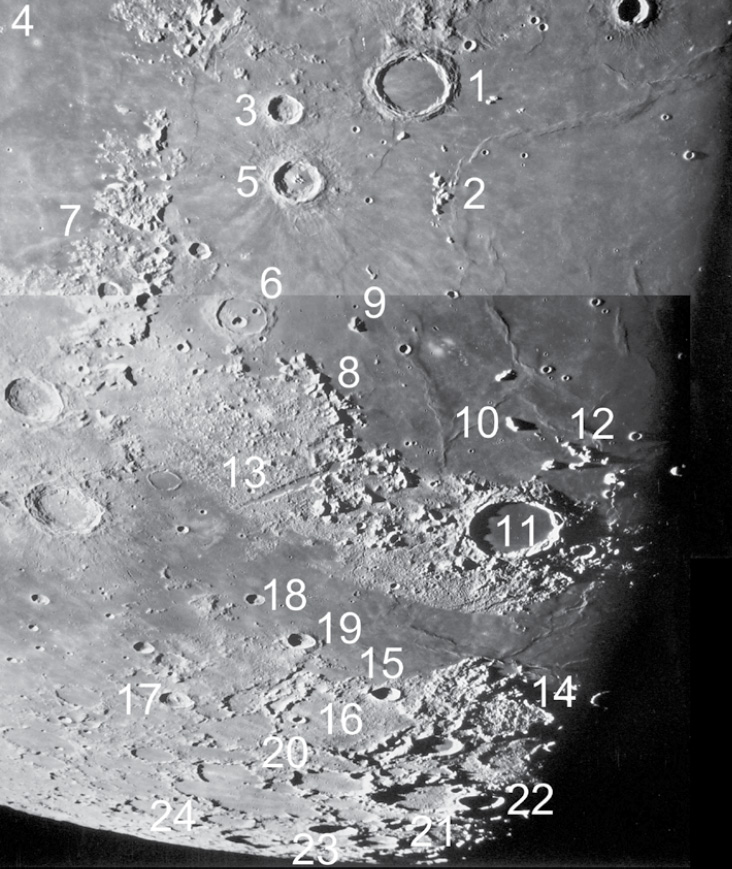
Figure 4:
Northern limb of the Moon on Day 8
1 Archimedes 2 Spitzbergen Range 3 Autolycus 4 Linne 5 Aristillus 6 Cassini 7 Caucasian Mtns 8 Alpine Mtns 9 Mt Piton 10 Mt Pico 11 Plato 12 Teneriffe Mtns 13 Alpine Valley 14 Birmingham 15 Timaeus 16 W C Bond 17 C Mayer 18 Protogorus 19 Archytas 20 Barrow 21 Goldschimdt 22 Anaxagoras 23 Scoresby 24 Meton
Images from the Consolidated Lunar Atlas maintained by the Lunar and Planetary Institute.
The fourth member of this ‘oblong’ group ARISTILLUS (Fig 4, 5), north of Autolycus, shows its central mountain and later a ray from its corona that crosses the north-west corner of M.Serenitatis. To the north of the crater, CASSINI (Fig 4, 6), with two craterlets in its floor lies at the angle formed by the CAUCASIAN (Fig 4, 7) and ALPINE MOUNTAINS (Fig 4, 8), that respectively form the east and north east coast of M. Imbrium. West of Cassini and following the curve of the shore of the Alps, the northern MT PITON (Fig 4, 9) and MT PICO (Fig 4, 10) south of the dark oval PLATO (Fig 4, 11), throw their shadows onto the sea’s floor. The TENERIFFE MOUNTAINS (Fig 4, 12) in the sea form a narrow V and further west along the curve is the aptly named STRAIGHT RANGE that points to the base of the unseen promontory LAPLACE, at the east end of SINUS IRIDIUM. Note that these ranges, mountains, the coasts of the Apennines, the Carpathians and a number of ridges form a circle.
Separating M Imbrium and M Serenitatis from M Frigoris is a landmass stretching from OCEANUS PROCELLARUM at the west to LACUS SOMNIORUM and LACUS MORTIS at the east that I call the LONG ISLAND, which seems a fitting description of the area. Midway along the island the oval dark floored PLATO stands out with its east wall throwing long shadows onto its floor at early morning lighting. The ALPINE VALLEY (Fig 4, 13) crossing the mountains (see Day 7) lies east of Plato. A broad area north of the crater narrows M Frigoris and points to a smaller peninsula across the sea that contains the triangular BIRMINGHAM (Fig 4, 14) that in turn points back to Plato.
We have entered the POLAR REGION that is often avoided due to a lack of guidelines and at times unfavourable libration in latitude. The best viewing is when the distance from the limb to Plato’s north wall is at least double that from Birmingham’s south point to Plato’s north wall. Plato’s oval shape is also a clue; the rounder the oval the better is the viewing and the reverse if it is elongated in its east west diameter.
A small deep crater with a central mountain FONTANELLE lies west of Birmingham’s west wall, but may not be visible until the following day. A second similar crater TIMAEUS (Fig 4, 15), also with a small central mountain, lies at the southwest border of the large broad V-shaped W C BOND (Fig 4, 16) east of Birmingham. W C Bond has a flooded floor, fragmented walls, and a craterlet at its east floor. The previous two small craters are part of the east west chain, starting from DEMOCRITUS in the east near THALES, the smallest member of the De la Rue –Strabo group lying close to the north east limb. Thales should be showing its ray system by now. Democritus is followed at approximate equal distances on a line to the west by the small KANE and C MAYER (Fig 4, 17), both with mountains in their floors and with the latter having two shallow companions between it and a small crater on W.C.Bond’s east wall. PROTOGORUS (Fig 4, 18) in the sea and the larger ARCHYTAS (Fig 4, 19) at the coast south of W.C.Bond are two small craters that also point to Timaeus. A south line through these small craters passes east of a small bright craterlet EGEDE A in the sea to continue between EGEDE at the south coast of the bay and Aristoteles at its east coast to enter Eudoxus.
A useful reference line is a north line dividing W. C. Bond in half, crossing its north ‘V’ end and two craterlets at the junction of the fragmented joined walls of BARROW (Fig 4, 20) to the east and GOLDSCHMIDT (Fig 4, 21) to the west. Both are of moderate size and both have flooded floors and ‘granular` walls with Barrow having a small crater at its southwest wall and Goldschmidt’s west wall being invaded by ANAXAGORAS (Fig 4, 22), a small oval crater that will develop an extensive ray system. Between W. C. Bond and Birmingham to its west, EPIGENESIS is formed by two joined craters and is recognized by its figure of eight shape. Closer to the limb and if libration is favourable, the line crosses CHALLIS and its north companion MAIN, appearing like two squashed sausages. The small but deeper SCORESBY (Fig 4, 23) with a central mountain touches Challis’s southeast end and is north of METON’S (Fig 4, 24) west end. Meton is a clover leaf like crater with fragmented walls that extends to the east towards the shallow elongated BAILLAUD with fragmented walls lying slightly north of the east end of Meton.